Table of Contents
uDropShip/UMarketplace Configuration
For the initial configuration we'll start with adding base shipping methods that will be used by drop shipping vendors, then we'll configure a local and a additional test vendor, and finish with the global drop shipping configuration.
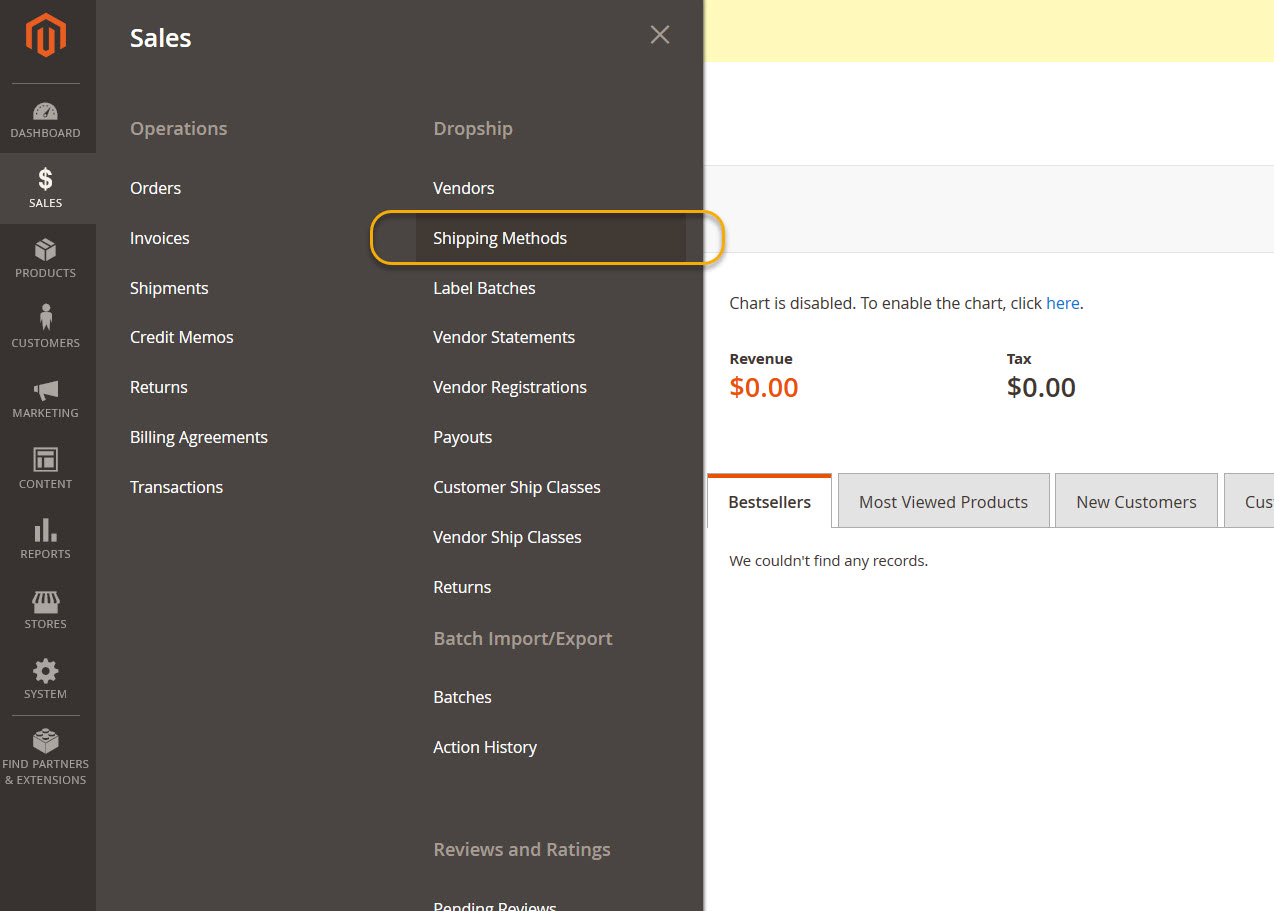
Dropship Shipping Methods
Conventions and Terminology
To avoid confusion, let's define some terms that will be used during this tutorial.
- Shipping Carrier - While original meaning of the term is a company that provides shipping services, in our case (and generally for Magento), it is assumed to be a method of shipping estimate calculation. For example, while UPS, USPS, FedEx and DHL are obviously shipping carriers, Flat Rate, Table Rate, MatrixRate are considered to be carriers as well, even though the actual company that will provide freight services might be different.
- Shipping Method - We will use this term to identify a Service Level within the same carrier. For example, Ground, Overnight, 2nd Day - are shipping methods, or service levels. For clarity we will attempt to use Service Level term whenever possible.
- System Method - uDropship extension uses and build upon existing Magento shipping carriers and methods to calculate shipping estimates. For our purposes, system methods will be methods, provided by Magento core and 3rd party extensions.
- Dropship Method - This is a special method, provided by uDropship extension, that combines system methods and presents a customer simple choice, hiding the complexity of different vendor shipping preferences.
Why do we need special shipping methods for dropship?
One of the main purposes of the uDropship extension is to make customer experience of purchasing from different vendors using the same shopping cart as transparent as possible. The extension will attempt to combine all shipping methods supported by vendors participating in the order, and show only the familiar choices for service levels, such as:
- Ground
- 3 Days
- Overnight
It is possible that 2 vendors in the same order prefer different shipping carriers, such as UPS and USPS, and support different service levels, for example:
- Vendor 1 supports:
- UPS Ground
- UPS 3 Days Select
- UPS Overnight
- Vendor 2 supports:
- USPS Parcel Post
- USPS Express Mail
With uDropship extension, the customer will be presented with a choice of:
- Ground - combines UPS Ground for Vendor 1 and USPS Parcel Post for Vendor 2
- 3 Days - combines UPS 3 Days Select for Vendor 1 and USPS Express Mail for Vendor 2
The UPS Overnight option will not be shown, because Vendor 2 does not support it.
This functionality can be altered by uDropship SplitRate add-on, which allows choosing different shipping carrier/service level for each vendor product group in the checkout.
Configuring a Dropship Shipping Method
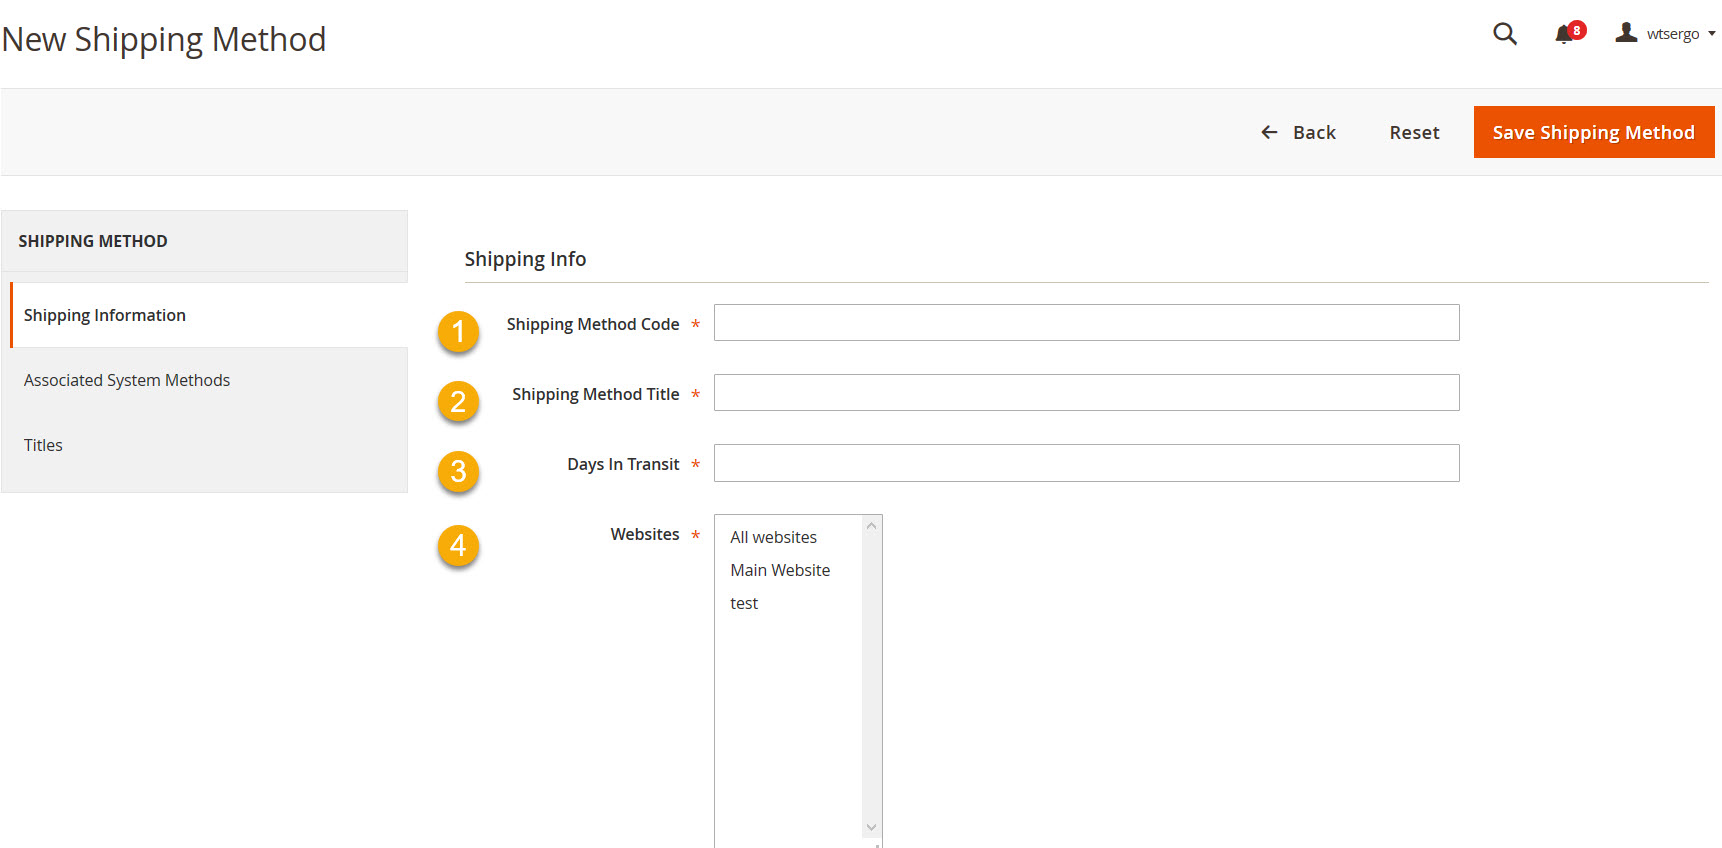
TAB: Shipping Information
1. Shipping Method Code - an internal code for this dropship method. Ex: ground, 3days, overnight
2. Shipping Method Title - a customer friendly label. Ex: Ground, 3 Days, Overnight
3. Days In Transit - currently used only to sort the methods on frontend. Ex: 7-10, 2, 1
4. Websites - choose on which websites this shipping method will be enabled.
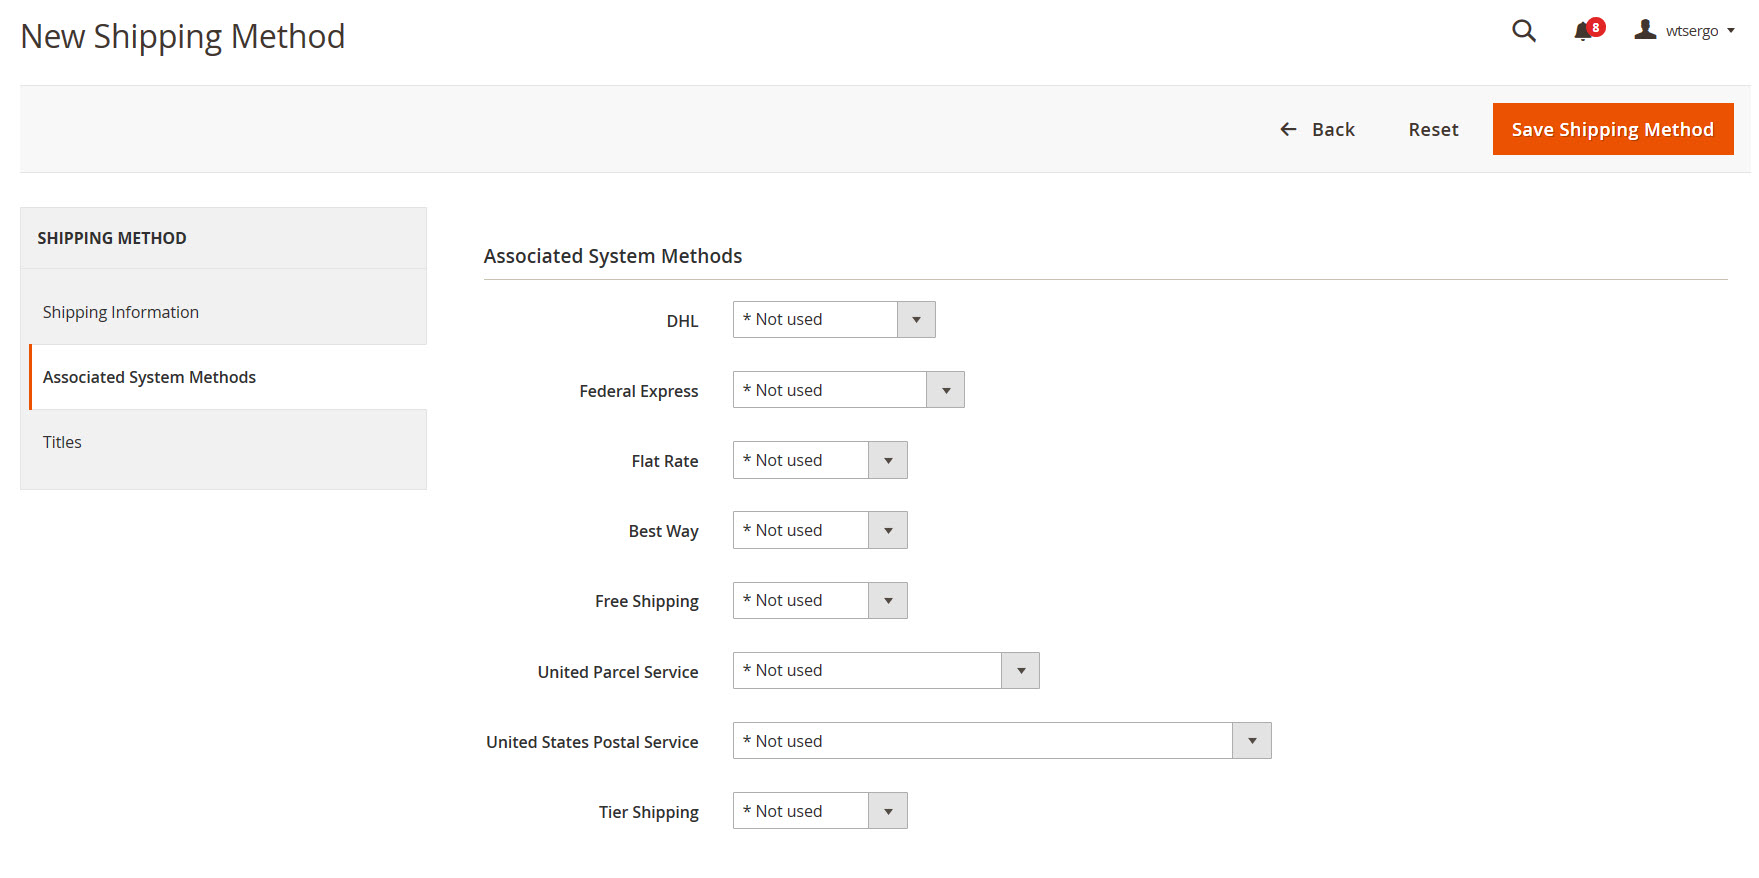
TAB: Associated System Methods
In this tab you can choose a service level for each available Magento carrier module (core and 3rd party), that corresponds to this dropship shipping method. If a carrier is not used, this method will not be available for vendors, which use this carrier for shipping.
Each system shipping method (service level) can be used only once through all dropship shipping methods. For example, if you chose Flat Rate/Fixed in Ground dropship method, you can't re-use it in Overnight again.
Usually, the Ground method contains the simple Magento system methods, such as Flat Rate/Fixed and Best Way/Table Rate. The free shipping configuration will be revisited later, but in general it is recommended to use Shopping Cart Price Rules for greater flexibility.
Special case: UPS
UPS can be globally configured to use CGI API or XML API. Choose a method that is compatible with your globally configured API type.
Dropship Vendors
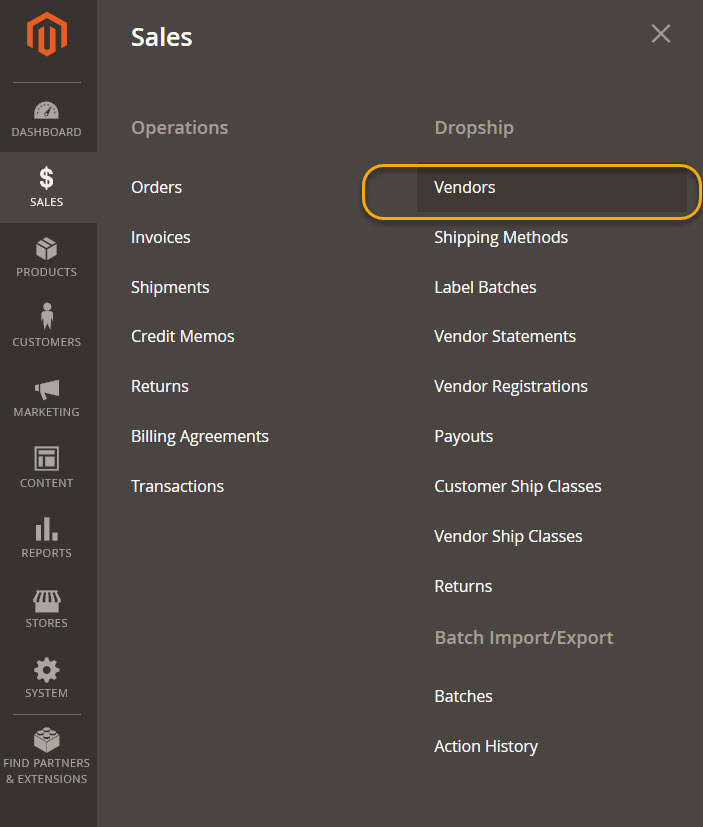
Vendors are the central functionality of the uDropship extension, and involve most of the configuration required.
Creating a new vendor
TAB: Vendor Information
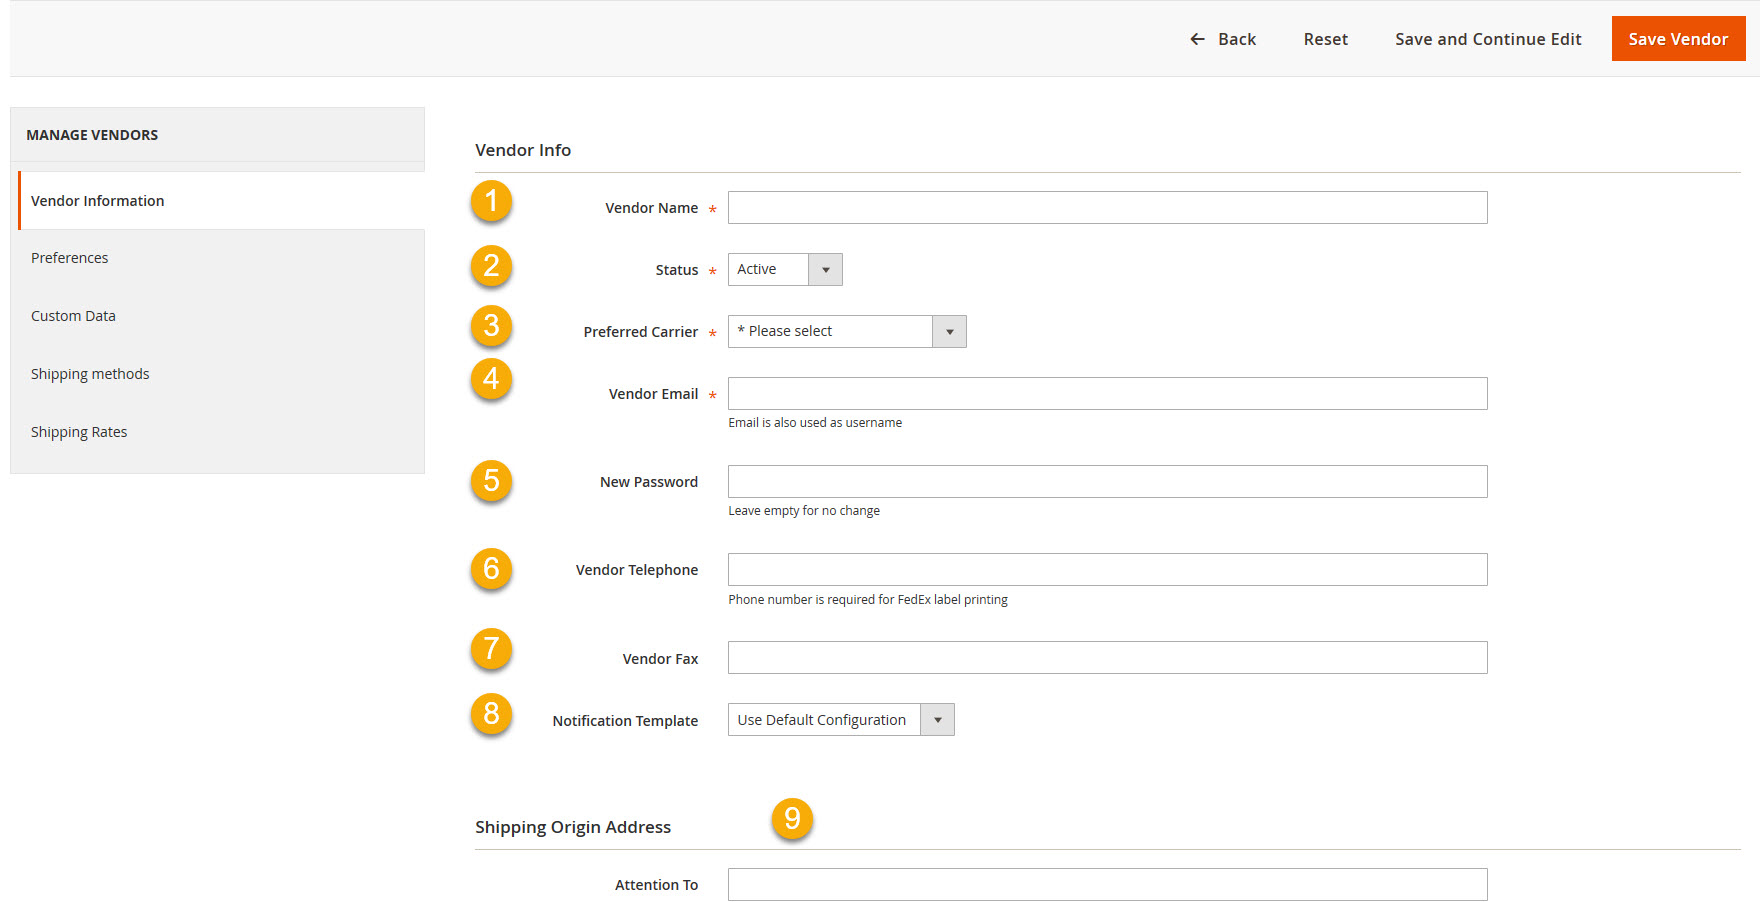
Vendor Info
1. Vendor Name
2. Status
3. Preferred Carrier - a carrier that is preferred by the vendor. Each dropship method for this vendor can be configured with different carrier.
4. Vendor Email - an email that is used to send new order notifications and vendor statements.
5. New Password - if you'd like to create or change vendor's password, enter it here.
6. Vendor Telephone - this field is required if the vendor will need to generate FedEx labels.
7. Vendor Fax
8. Notification Template - each vendor can have a different new order notification template, managed as regular Magento Transactional Emails.
Shipping Origin Address
9. This address will be used as origin for shipping rate calculations.
TAB: Preferences
Fields in this tab can be easily added or customized, refer to Customization page.
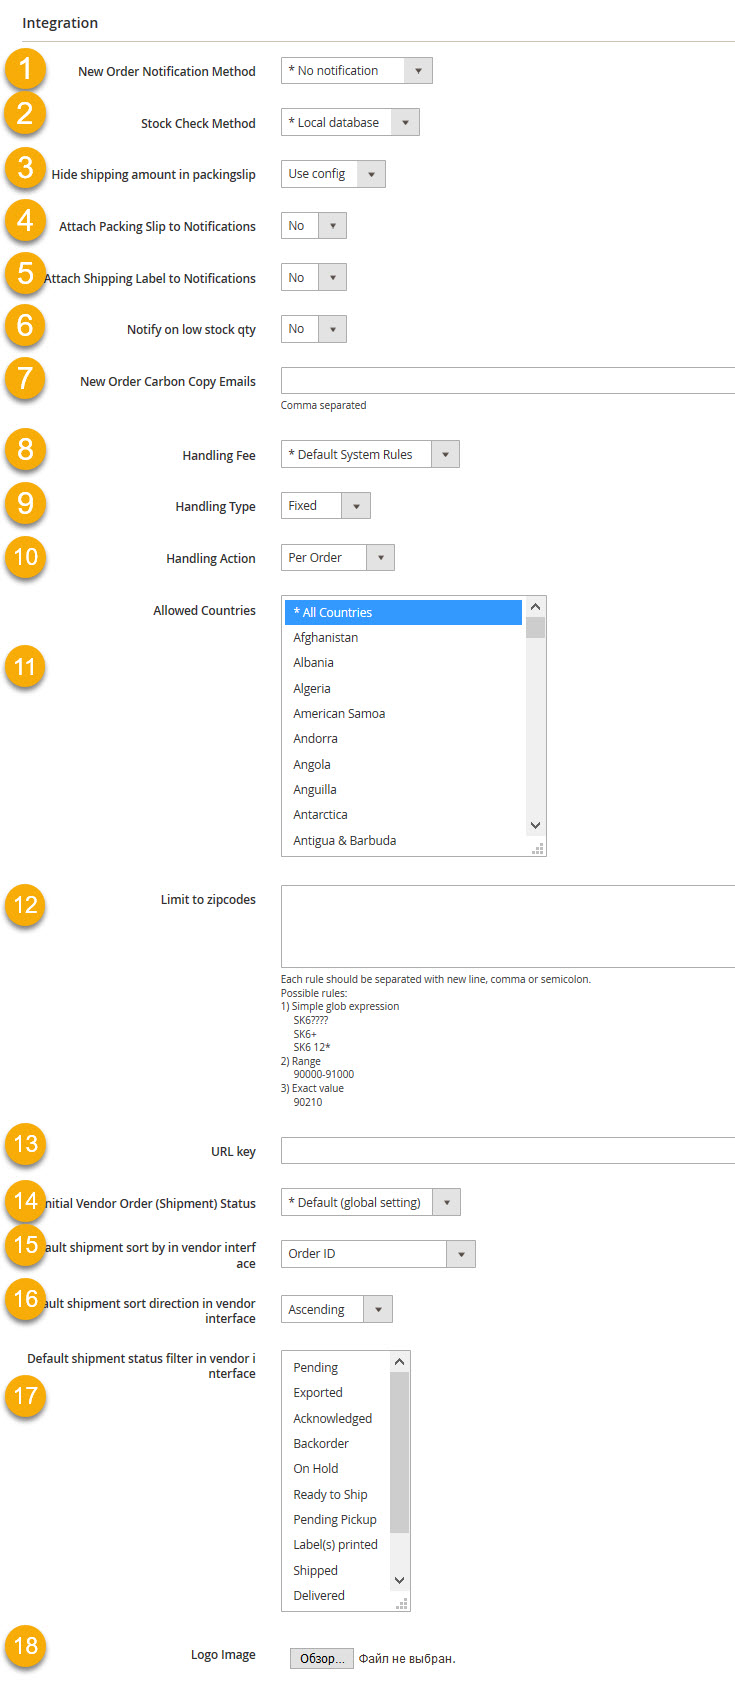
Integration
1. New Order Notification Method - each vendor can prefer to be notified differently. By default there are Email notification and No notification. Add-ons can provide additional methods of notification, such as CSV uploads or API calls.
2. Stock Check Method - By default there's only Local database method, which uses regular Magento stock logic, or multi-vendor stock logic, if MultiVendor add-on is installed.
3. Attach Packing Slip to Notifications - the vendors can choose to receive pre-generated packing slip for their part of the order, attached to new order notification email
4. Hide shipping amount in packingslip - the shipping amount can be hidden and not shown on the packing slip.
5. Attach Shipping label to Notifications - a choice to generate and attach auto-generated shipping label for the full weight and value of vendor's part of the order.
6. Notify on low stock qty - notify the vendor if the stock is running low.
7. New Order Carbon Copy Emails - comma separated emails to include when sending new order notifications.
8. Handling Fee, 9. Handling Type, 10. Handling Action - each vendor can have a special handling fee.
11. Tax Regions - for US, the tax should be charged only for purchases made from the companies doing business within the same state as the customer. Choose in which states the vendor operates for correct tax calculation.
12. Limit to zipcodes - Deliveries can be limited to specific zip codes.
13. URL key - currently used only by MicroSite add-on, to allow a subdomain for each vendor's store. For example URL key “barney” will yield barney.mystore.com domain name.
14. Initial Vendor Order (Shipment) Status - Set the initial shipment status when an order is placed.
15. Default shipment sort by in vendor interface - Set the default sorting e.g. If Order Id is selected all orders will be sorted by the Order Id when the Vendor logs in to their interface.
16. Default shipment sort direction in vendor interface - Set if the default sorting direction should be descending or ascending.
17. Default shipment status filter in vendor interface - Which filter should be set by default when the Vendor logs in to their interface.
18. Logo Image - an image to be used on vendor's product pages or landing page.
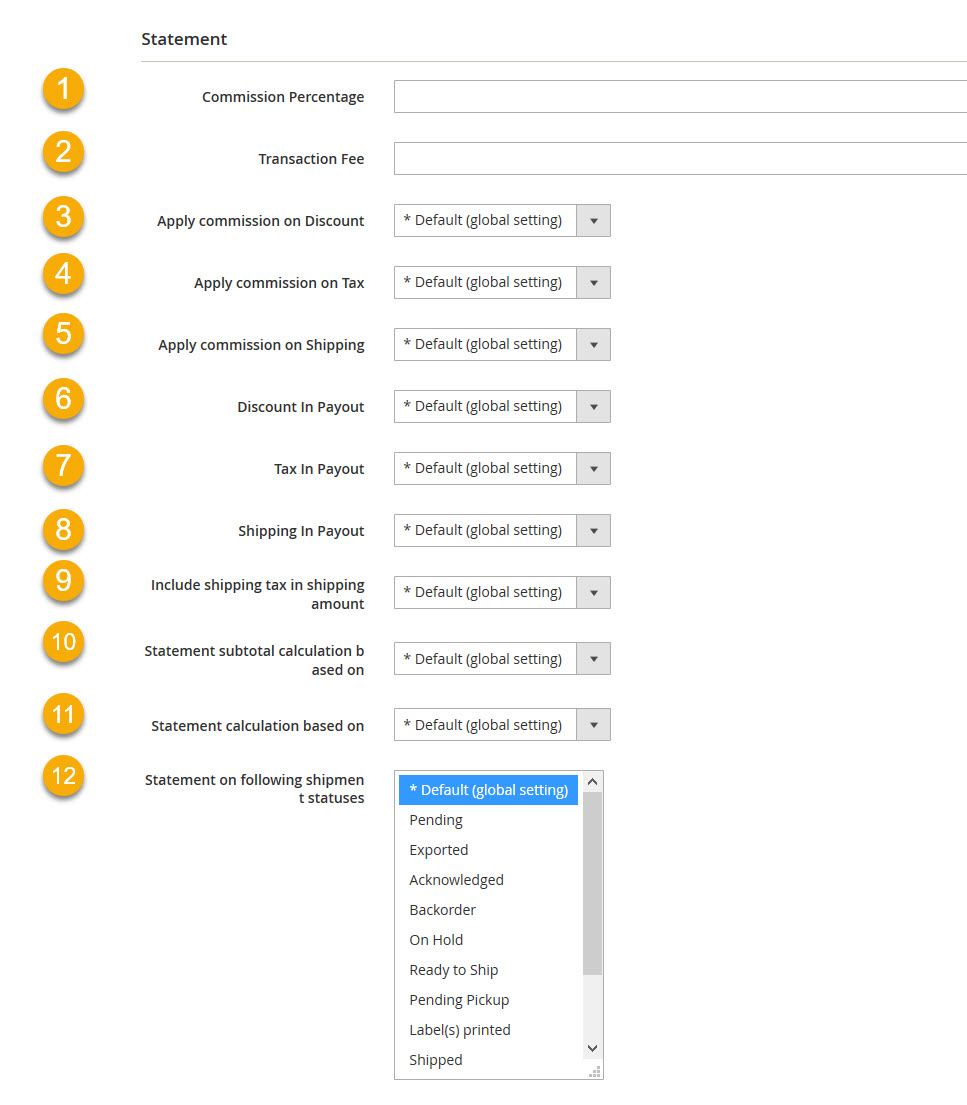
Statement
1. Commission Percentage - percentage of sale to be taken out of vendor's payout
2. Transaction Fee - a flat transaction fee to be recorded in orders
3. Apply commission on Discount - this will increase statement total by discount commission
4. Apply commission on Tax - commission can be applied on tax (if include tax in payout) and total will be reduced by by tax commission. Commission on price is calculated on price without tax. To calculate commission on price including tax, select that option to Yes and include tax in statement.
5. Apply commission on Shipping - this will reduce statement total by shipping commission
6. Discount in Payout - if discount should be considered in statement
7. Tax In Payout - how, and if tax should be shown in the payout.
8. Shipping In Payout - how, and if shipping should be shown in the payout.
9. Include shipping tax in shipping amount - if shipping tax should be displayed as part of shipping in statement totals or as part of tax.
10. Statement subtotal calculation based on - What the subtotal should be based on.
11. Statement calculation based on - What the statement calculation should be based on.
12. Statement on following shipment statuses - On which status a statement is created.
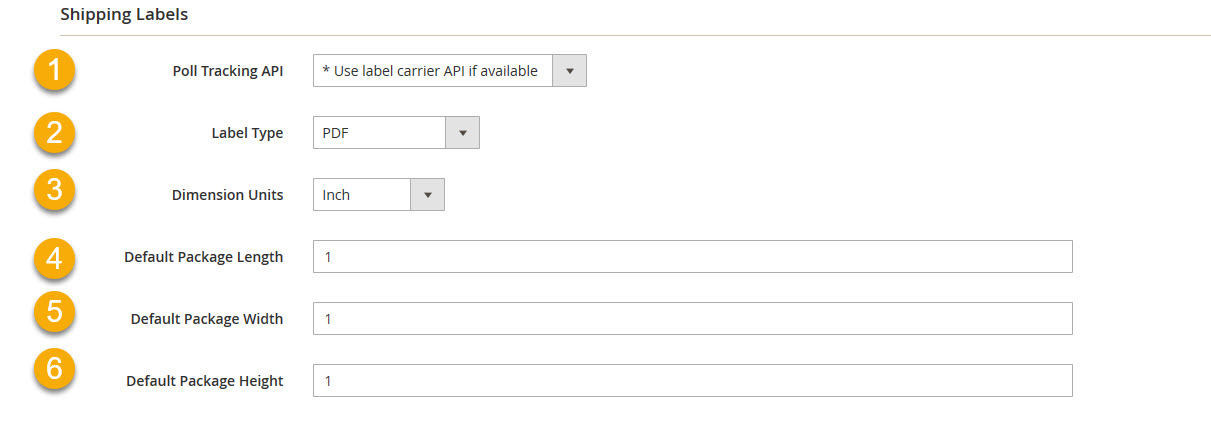
Shipping Labels
1. Poll Tracking API - which carrier API to use for tracking whether the package was picked up from vendor's location by the carrier. Currently only FedEx is implemented.
2. Label Type - which labels the vendor prefers to print - PDF (laser printer) or EPL (thermal printer, ex. Zebra LP2844)
3. Dimention Units - dimention units (Inch/Centimeter) used by the vendor
4. Default Package Lenght, 5. Width, 6. Height - default values to be pre-filled when vendor generates label from the vendor interface. Can be changed for each package.
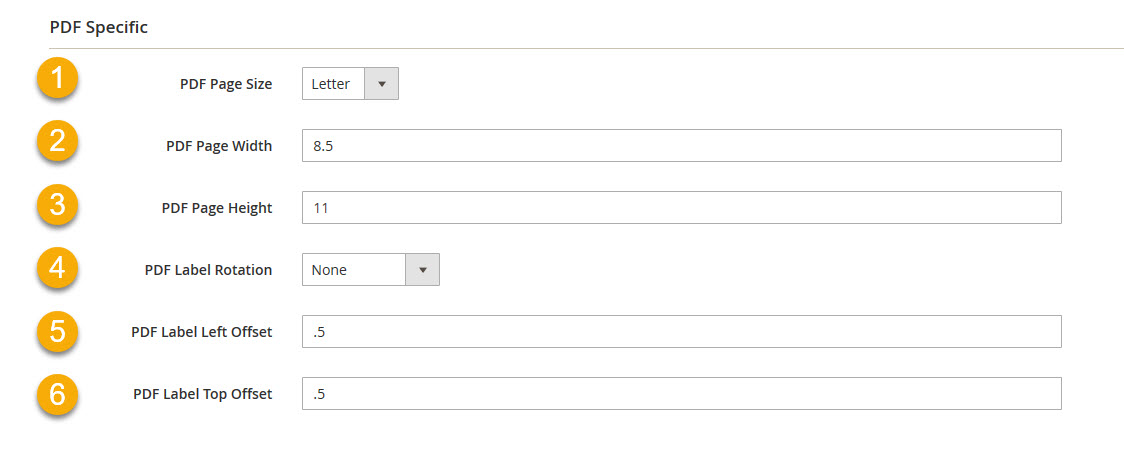
PDF Specific
EPL Specific
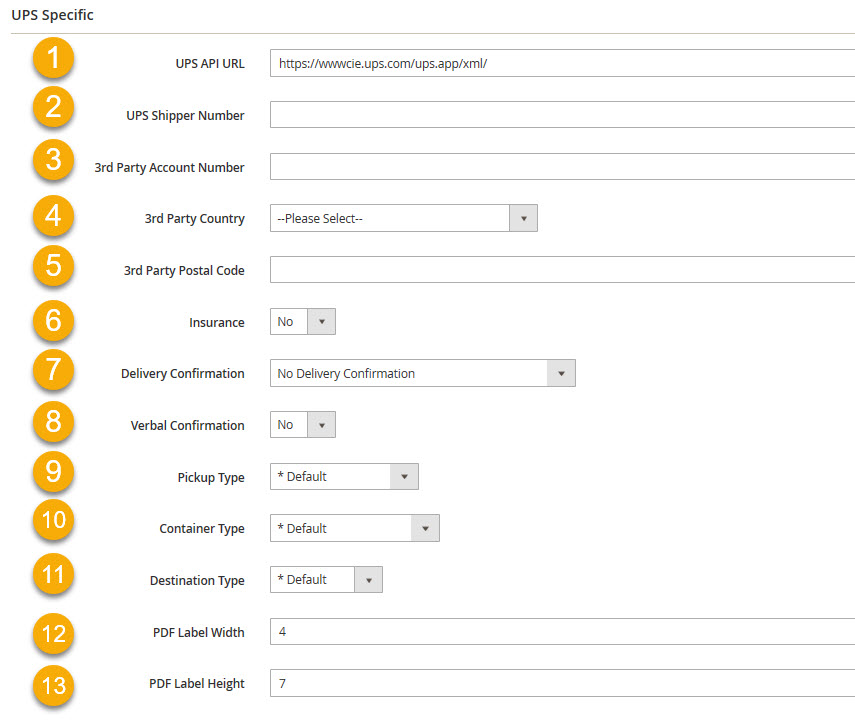
UPS Specific
1. UPS API URL - valid values are:
- https://wwwcie.ups.com/ups.app/xml/ - test server
- https://www.ups.com/ups.app/xml/ - live server
- https://onlinetools.ups.com/ups.app/xml/ - live server
2. UPS Shipper Number - shipper number specific for the vendor. If left empty will use global UPS shipper number.
3. 3rd Party Account Number, 4. Country, 5. Postal Code - fill only if using 3rd party to pay for the shipments
6. Insurance , 7. Delivery Confirmation, 8. Verbal Confirmation, 9. Pickup Type, 10. Container Type, 11. Destination Type - UPS package options
12. PDF Label Width, 13. Height - label size for PDF printouts (in units configured above)
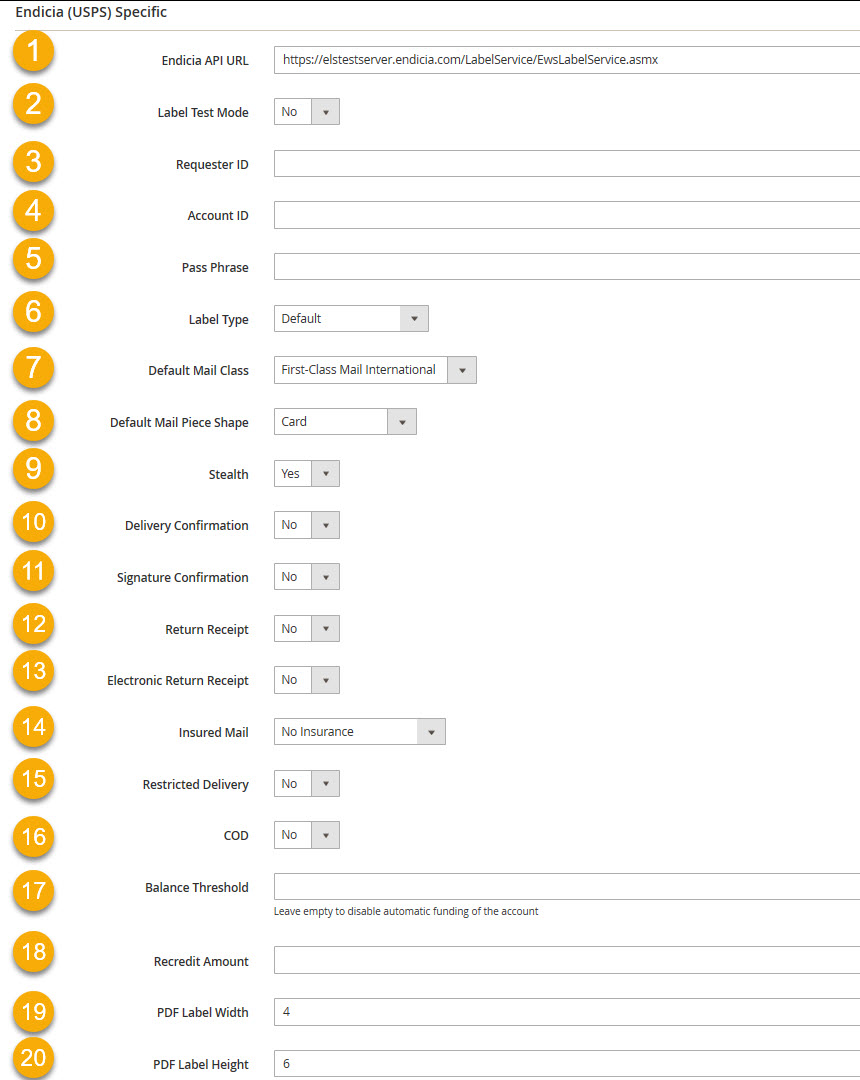
Endicia (USPS) Specific
To print USPS labels you will need both Endicia and USPS accounts.
1. Endicia API URL - valid values are:
- https://www.envmgr.com/LabelService/EwsLabelService.asmx - test server
2. Label Test Mode - test mode
3. Requester ID - USPS account ID (usually this format: 000AAAAA0000)
4. Account ID - Endicia account ID
5. Pass Phrase - Endicia pass phrase
6 - 20. USPS package options
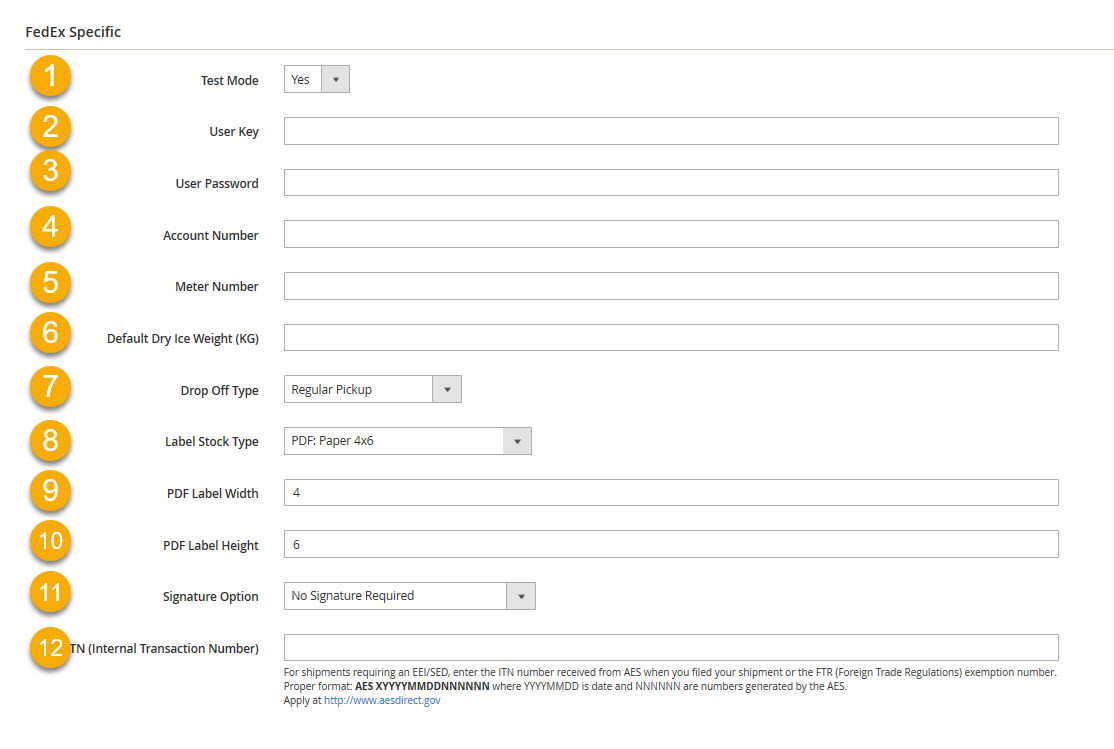
FedEx Specific
1. Test Mode
2. User Key, 3. Password 4. Account Number, 5. Meter Number - FedEx account credentials
6 - 12 . FedEx package options
TAB: Custom Data
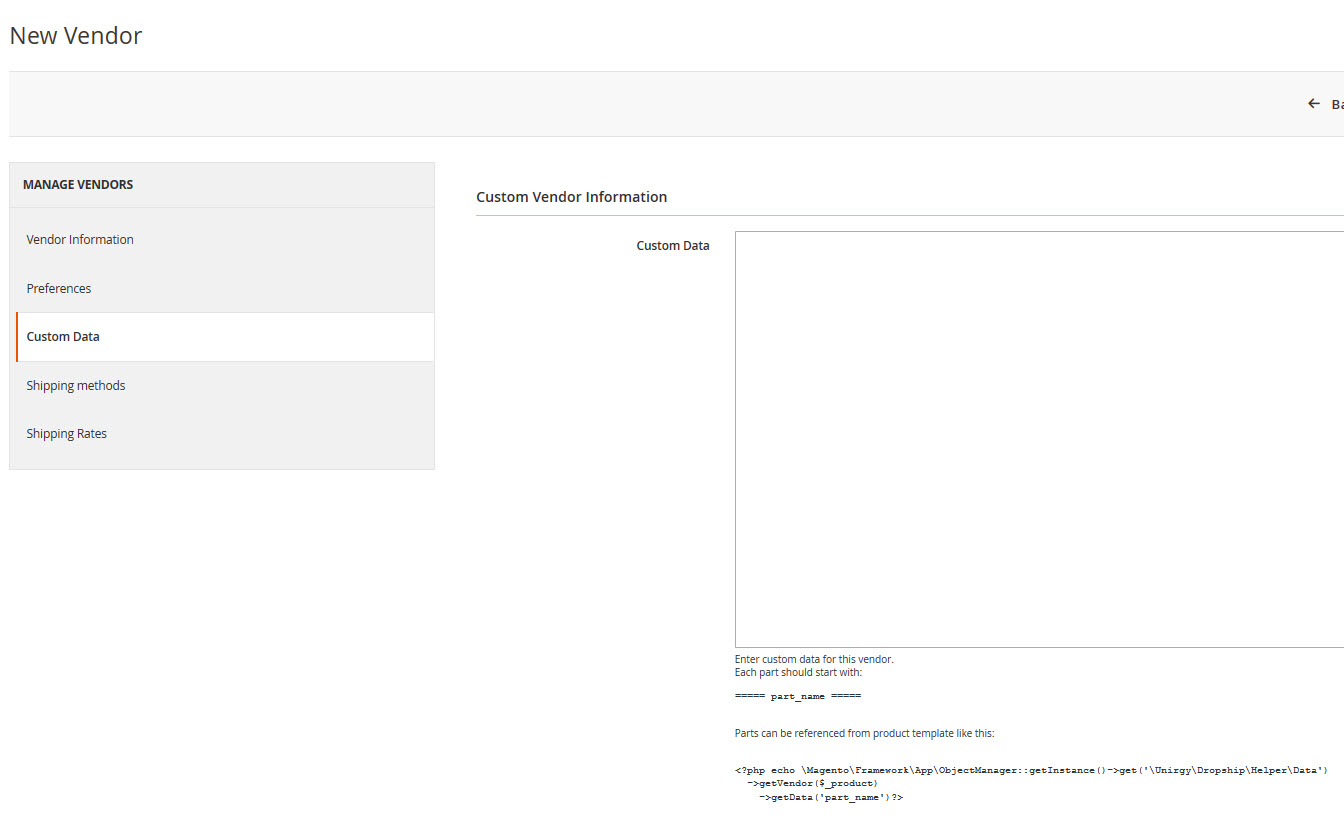
This tab is used for quick entry and editing of vendor specific text, that can be used on store pages. Follow the instructions on the tab.
TAB: Shipping methods
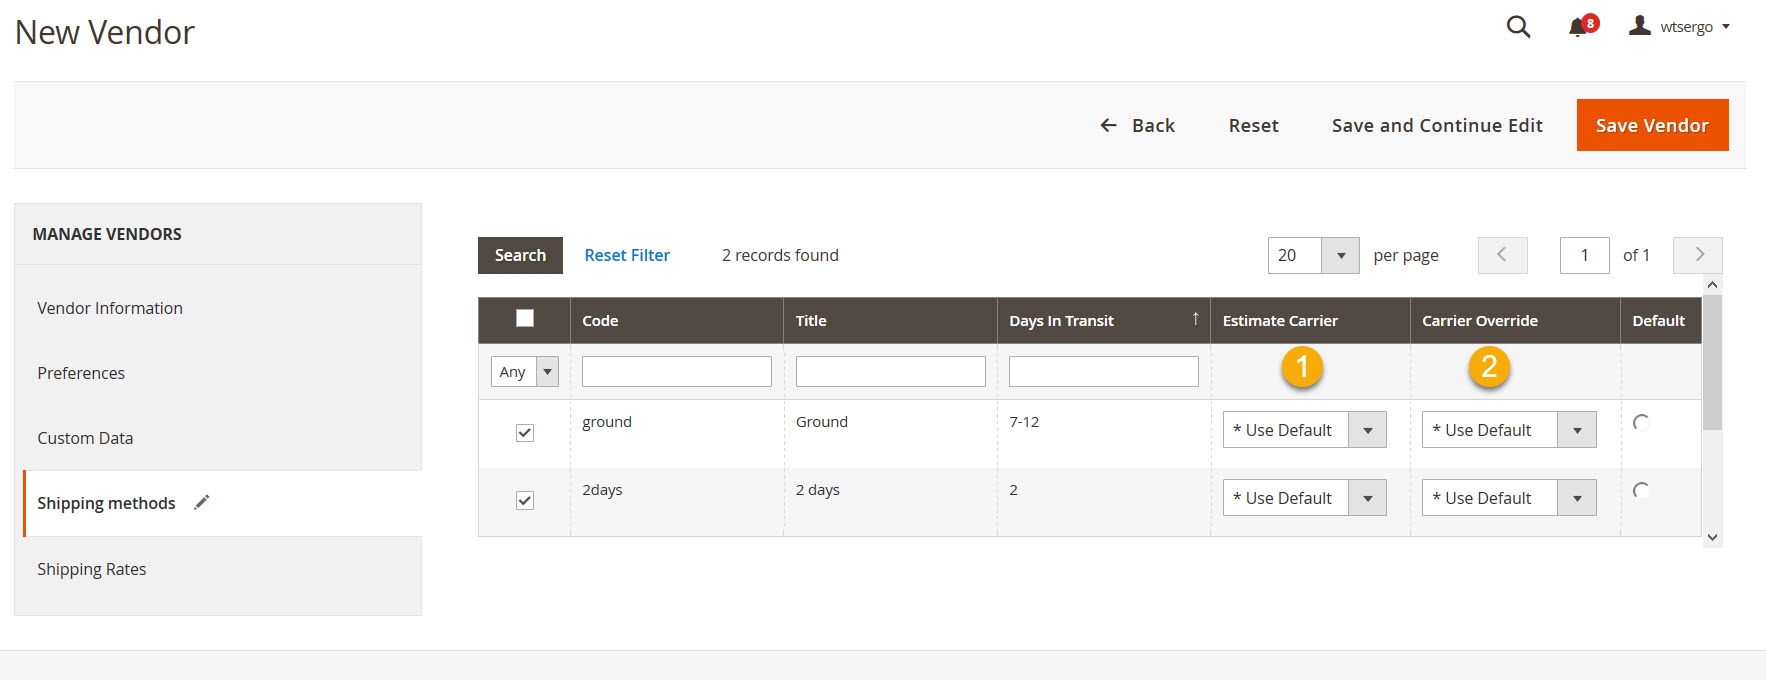
Here you can specify which dropship shipping methods current vendor supports. To enable a method for the vendor, click the checkbox on the left of the grid.
1. Estimate Carrier
- If you would like to calculate the estimate for this vendor's method using a different carrier than vendor's preferred, use this column.
- For example, if the carrier uses UPS for general shipping, but you'd like to give a flat rate of $5 for Ground service level, choose “Flat Rate” in the dropdown for the Ground method.
- Note, that for both vendor and customer, the shipping carrier will stay UPS, even though the calculation used different carrier.
2. Carrier Override
- If the vendor prefers to ship USPS as Ground, choose USPS in this column, and the vendor will receive instruction to ship using this carrier.
- The customer will see USPS on shipping notification email as well.
TAB: Associated Products
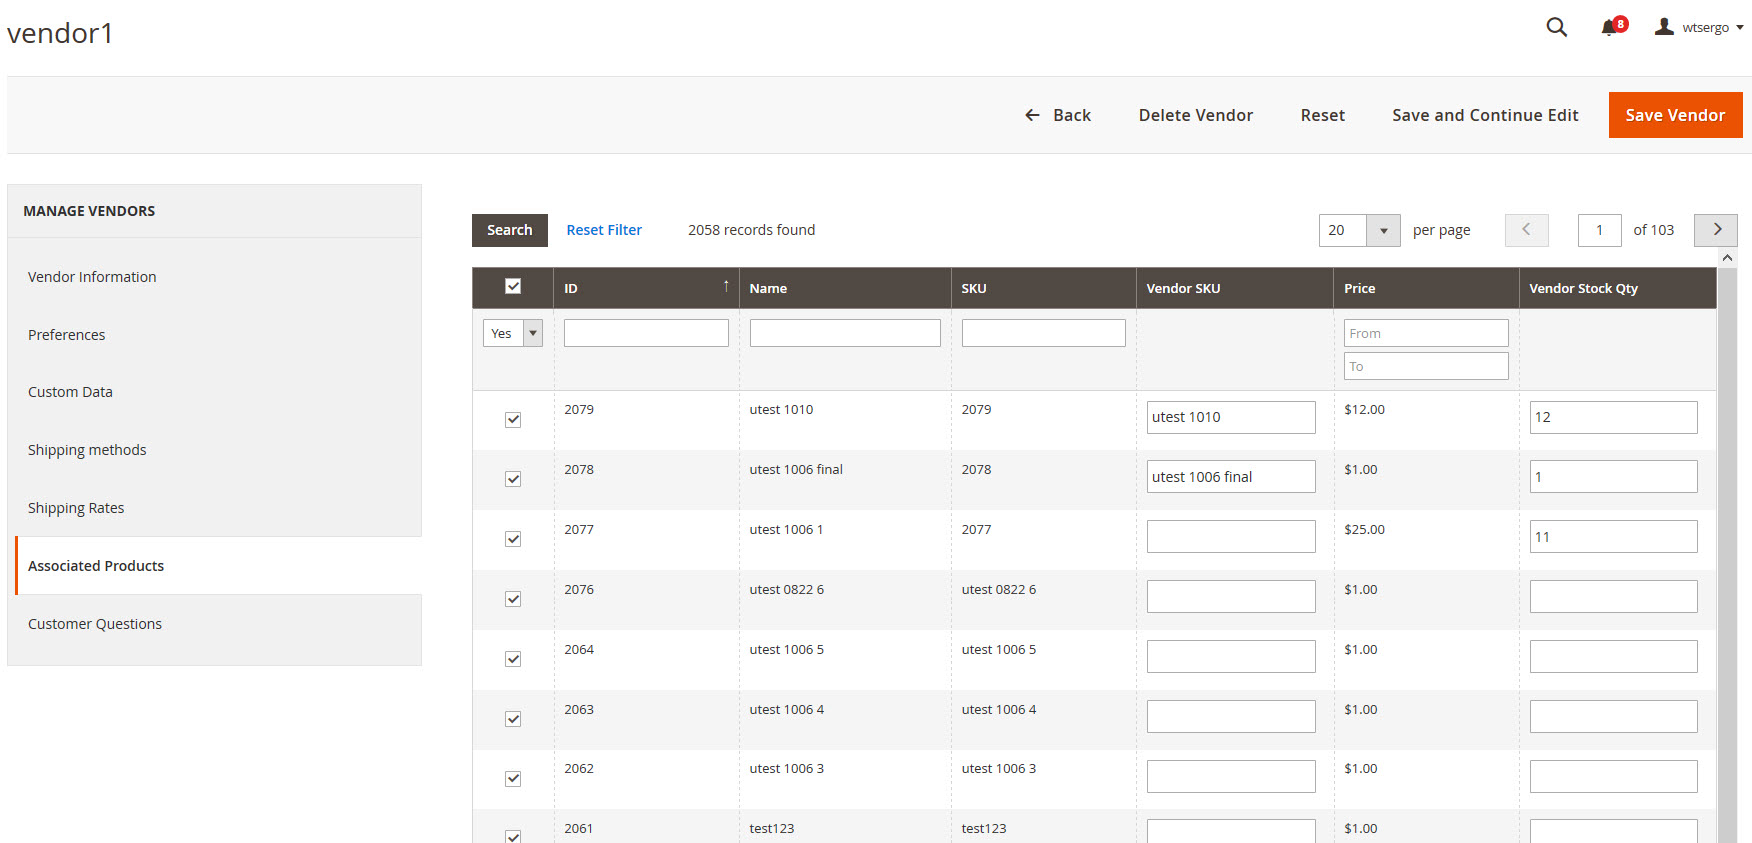
Here you can see which products are associated with the current vendor. Use the check boxes on the left to add/remove the associations.
If you have MultiVendor add-on installed, there will be additional fields to enter Vendor SKU, Cost and Stock Qty, specific for this vendor. The fields will be enabled for associated products only.
Vendor Portal URL
By default vendor portal URL is at
<magento base url>/index.php/udropship
Vendor need to login there to access vendor portal: backend where they process orders, change inventory, settings etc.
Global Dropship Configuration
Configuration Sections
Administrator Options
1. Subscribe for extension update notifications - You can choose to receive notifications of upgrades available. We recommend setting this to yes.
2. Vendor Comments Receiver (store owner) - Vendors can submit comments to store owner, which will sent by email and saved in order shipment history. Choose an identity that will receive these notifications.
3. Vendor Comments Email Subject - a template for the subject of vendor comment notifications.
4. Vendor Comments Template - tags are allowed for both email subject and template:
{{vendor_name}}- name of vendor that submitted the comment{{order_id}}- related Magento Order ID{{shipment_id}}- related Magento Shipment ID (vendor's part of the order){{vendor_url}}- direct link to vendor edit page in admin{{order_url}}- direct link to order view page in admin{{shipment_url}}- direct link to order shipment page in admin{{comment}}- comment text
5. Letterhead Info - Your store name and address to be printed on vendor statements
6. Letterhead Logo - Logo image to be printed on vendor statements
7. Admin Interface Theme - if you're using a custom admin theme, enter it here
8. Show vendor rates in “Shipping & Handling Information” box of order view page - Show or hide the vendor rates.
Vendor Options
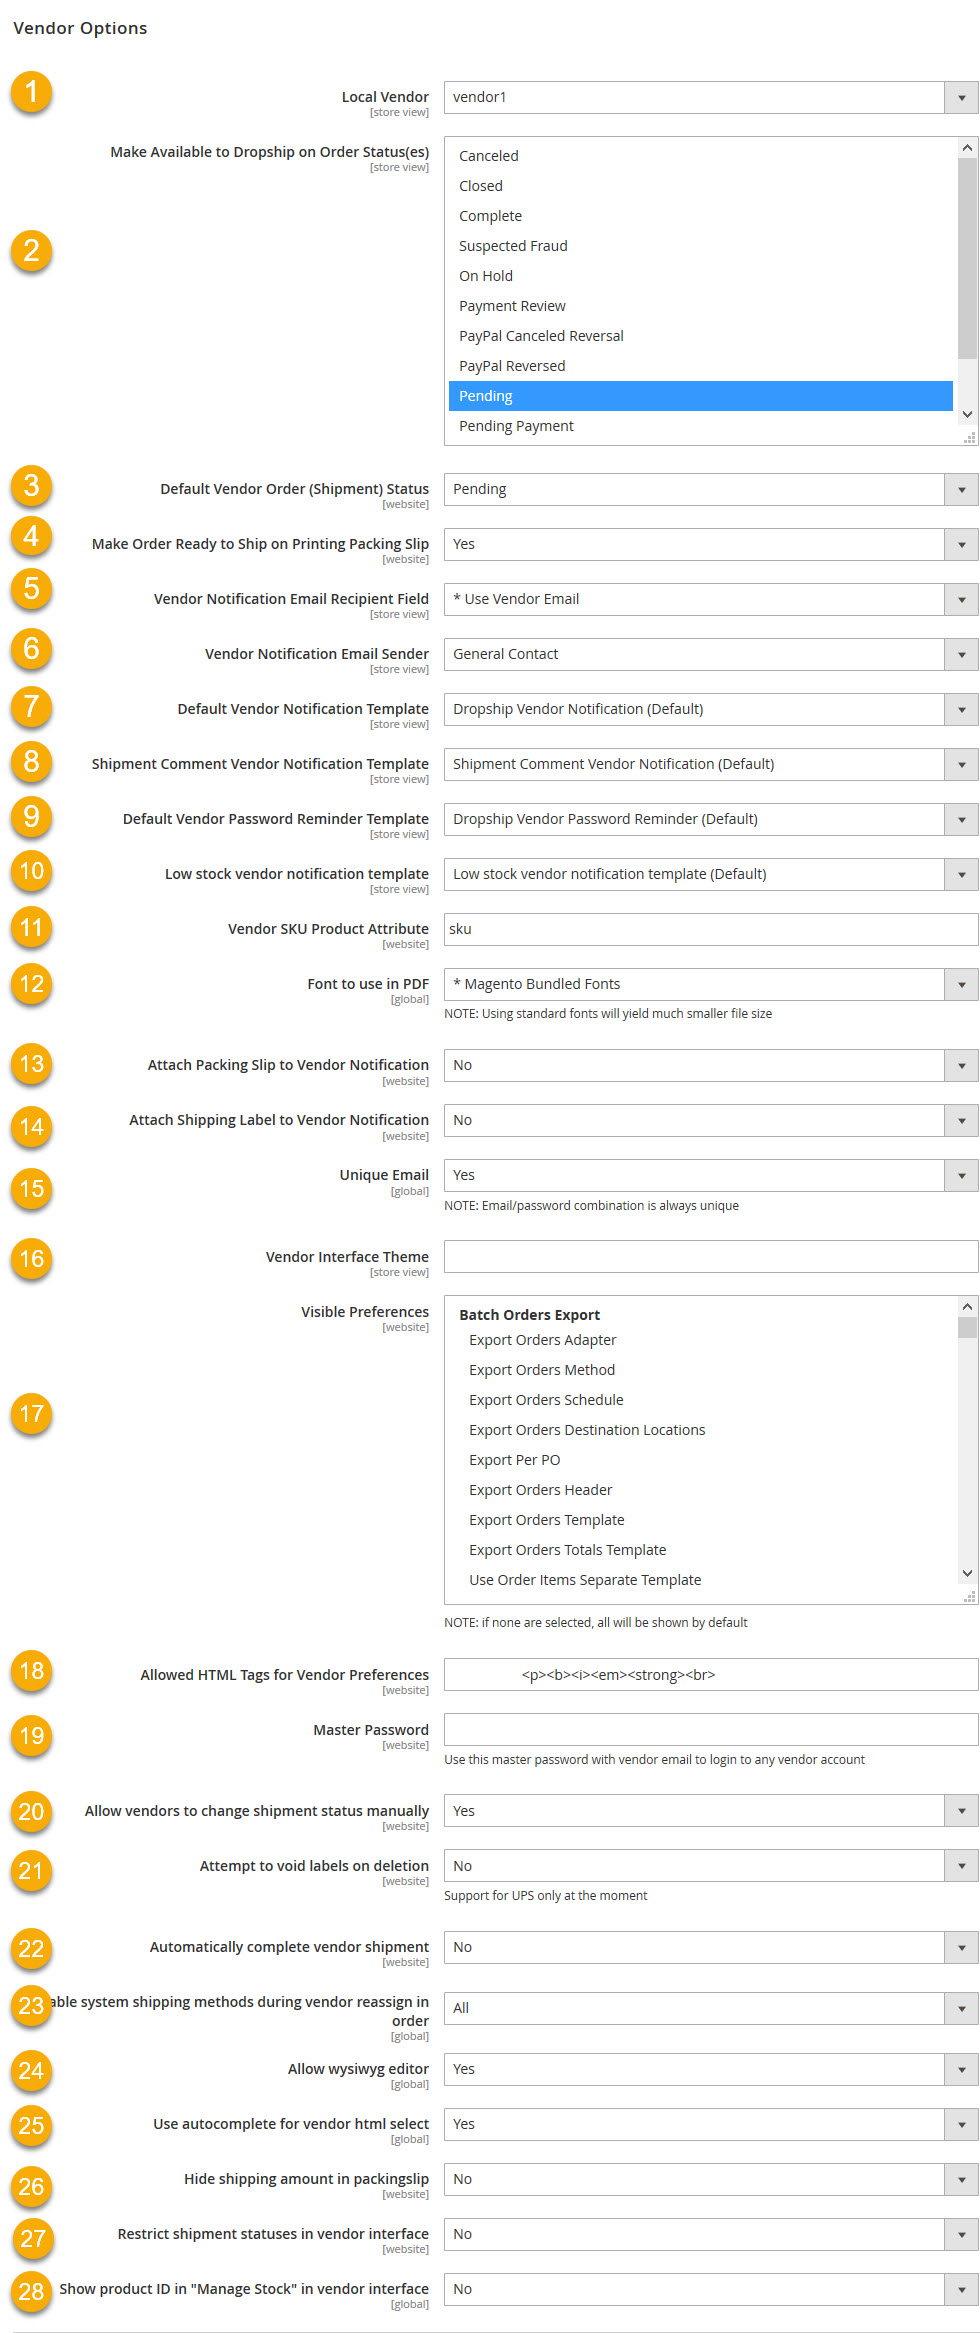
1. Local Vendor - a local or default vendor. For example, will be used when no vendor is associated with a product.
2. Make Available to Dropship on Order Status(es) - select one or multiple statuses that the order should reach before notifying vendors. By default Processing.
3. Default Vendor Order (Shipment) Status - which status to give vendor's part of the order when it's created. By default Pending.
4. Make Order Ready to Ship on Printing Packing Slip - change order status to Ready to Ship when packing slip is printed.
5. Vendor Notification Email Recipient Field - If you wish to use a vendor email for notifications that is different from vendor login email, change here the field used for custom email address.
6. Vendor Notification Email Sender - from which identity new order notifications should be sent to vendor
7. Default Vendor Notification Template - a default template for the notification. Can be set specifically for each vendor.
8. Shipment Comment Vendor Notification Template - a default template for shipment comment notifications and can be set for each Vendor.
9. Default Vendor Password Reminder Template - a default template for password reminders.
10. Low stock vendor notification template - a default template for low stock notifications and can be set for each Vendor.
11. Vendor SKU Product Attribute - An attribute to store the Vendor's product SKU. This enables you to have a SKU for your store and store the Vendor's SKU.
12. Font to use in PDF - You can set which font set to use. Please note, using standard fonts will create smaller files.
13. Attach Packing Slip to Vendor Notification - a global configuration to disable the attachment for all vendors.
14. Attach Shipping Label to Vendor Notification - same as above
15. Unique Email - if you have a situation that multiple vendors are using the same email to login, set this to “No”. Email/Password combinations are always unique.
16. Vendor Interface Theme - set here a custom theme for vendor interface.
17. Visible Preferences - which preferences vendors should be able to see and edit in vendor interface.
18. Allowed HTML Tags for Vendor Preferences - allowed filtered tags for vendor interface preferences.
19. Calculate order tax based on vendor locations - whether to use Tax Regions vendor preference for tax calculations.
20. Master password - use this password to log in to any vendor's account in vendor interface, using their email address.
21. Allow vendors to change shipment status manually - show/hide “Change shipment status” in vendor interface
22. Attempt to void labels on deletion - This is only supported for UPS at the moment.
23. Automatically complete vendor shipment when all items are shipped - set to yes, if preferred work flow is to mark the vendor part of the order complete after the first package shipment.
24. Available system shipping methods during vendor reassing in order - Set to have all shipping methods available or limit the available methods.
25. Allow wysiwyg editor - Enable.Disable the editor.
26. Use autocomplete for vendor html select -
27. Hide shipping amount in packingslip - The default shipping amount display int the packing slip.
28. Restrict shipment statuses in vendor interface, 29. Show product ID in “Manage Stock” in vendor interface - Vendor interface settings.
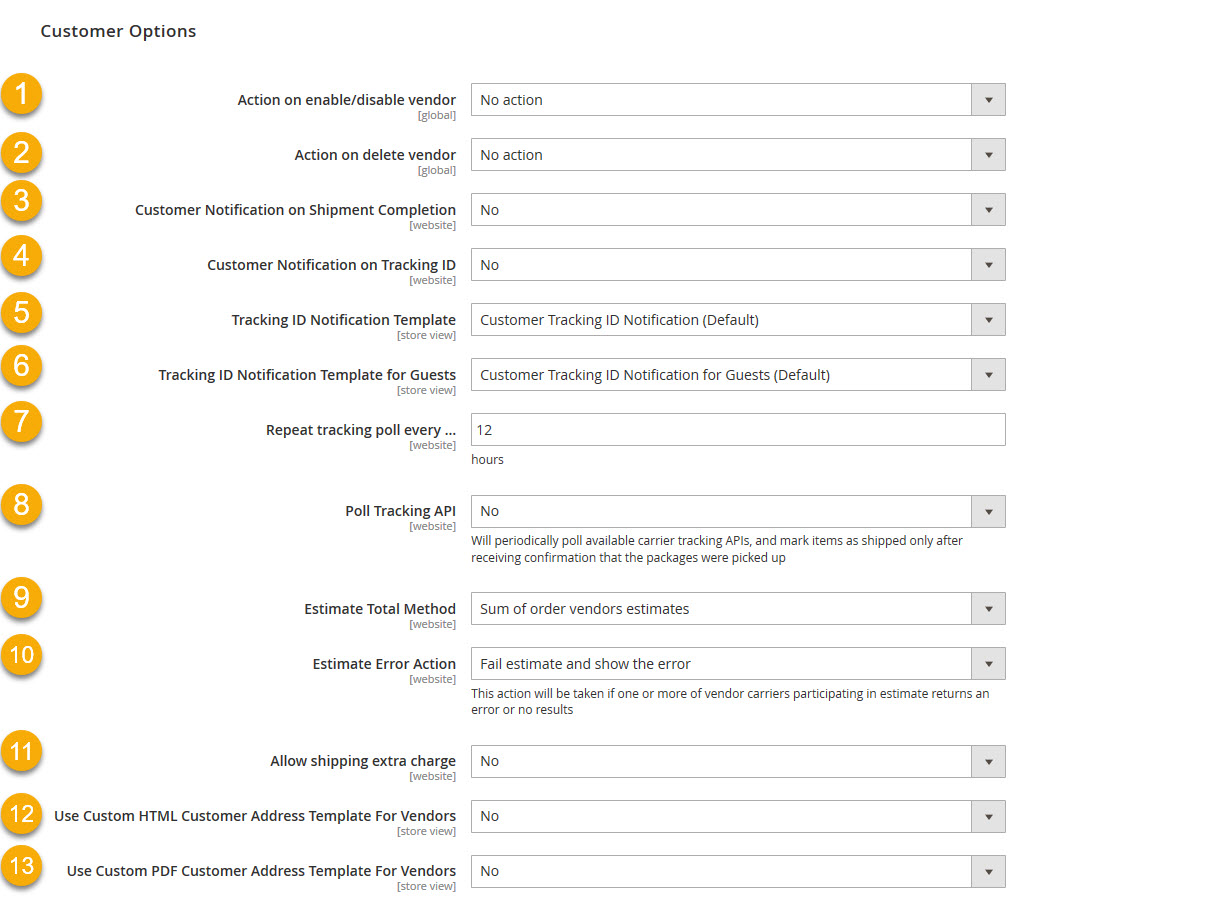
Customer Options
1. Action on enable/disable vendor - You can set the Vendor's products to not show if the Vendor is disabled.
2. Action on delete vendor - Specify what should happen when a Vendor is deleted.
3 - 4. Customer Notification - decide when to notify customer about shipments
- When Vendor Shipment is complete - only after vendor's part of the order has been marked complete, send a notification.
- When Tracking ID is added - each time a tracking ID is added or shipping label is generated, a notification will be sent to customer
5. Tracking ID Notification Template, 6. Tracking ID Notification Template for Guests - You can set custom notification templates for tracking. You can also have separate templates for regetered users and guests.
7. Repeat tracking poll every … - How often poll tracking should happen.
8. Poll Tracking API - globally enable/disable tracking package pickup from vendors and send notifications to customers only when their packages were picked up (only FedEx is currently supported)
9. Estimate Total Method - Select how the estimate total should be calculated.
10. Estimate Error Action - what to do when one or more of the carriers used to calculate vendor's shipping estimate failed to return results.
- Fail estimate and show the error - fail the whole estimate and show the error to the customer, require to retry the estimate request.
- Skip failed carrier call and show pricess without - ignore the error and show estimates including only successfully completed requests info.
11. Allow shipping extra charge - it's specific to Split-Rate add-on. Allows you to provide customer a duplicates of shipping rates but with extra charge, e.g when you want to provide customer some extra service in addition to normal shipping.
12. Use Custom HTML Customer Address Template For Vendors - if you want to hide from vendor parts of customer address like phone number you can use this option. when select “yes” extra option HTML Customer Address Template For Vendors will appear. Copy template from global option Configuration > Customer Configuration > Address Templates > HTML remove phone, other lines or add some extra information. In vendor preferences there is vendor specific option that allows override this global config.
13. Use Custom PDF Customer Address Template For Vendors - same as 12 but for PDFs (packingslip, Advanced PO Purchase Order PDF)
Vendor Statements Options
1. Statement Email Sender - Magento identity which will appear as vendor statement sender
2. Statement Email Template - a template that will be used for vendor statement email body
3. Adjustment Comment Trigger Word - if there was a refund, and it was a vendor's fault, you can add a comment to the order shipment (vendor's part), which starts with this word and contains vendor's liability amount, and it will be subtracted from vendor's payout. The vendor will see the notification in vendor interface for this order as well. Ex: ADJUSTMENT.
- Example of order shipment comment:
ADJUSTMENT: -120
Customer did not receive the item in time, cancelled the order
Product Stock Options
Vendor Decision Method - choose how to decide, which vendor will be used to calculate shipping estimate and fulfill order items. * Always use assigned vendor - the vendor associated with the product will always be used. * When in stock use local, otherwise use vendor - if a product is in stock, it will be shipped from local vendor, otherwise send notification to vendor. * MultiVendor add-on options:
- Least Packages + Lower Cost - choose the vendors based on stock availability, number of packages and lowest cost of goods.
- Least Packages + Geo Proximity - choose the vendors based on stock availability, number of packages and geographic proximity to the customer.
Miscellanious
Email Transport - in future versions will have ability to choose installed supported 3rd party transport * Automatic - will use regular magento transport (sendmail or smtp), or supported 3rd party email extension (currently supported are: Aschroder_SMTPPro, Aschroder_GoogleAppsEmail, ArtsOnIT_AdvancedSmtp) * Sendmail - If you use sendmail to send emails, use this option to specify -f parameter for “Return-path” envelope header.
Error Notifications Options
1. Enabled - Eanble or disable Dropship Error Notifications.
2. Sender (email from identity) - Where the email should come for. This is usefull if you setup a special email that collects error messages.
3. Receiver (store owner) - Who should receive the email. Again very usefull to filter error messages from other email.
4. Label Request Failed Email Subject, 5. Label Request Failed Email Template - Options for lable request error emails.
6. Poll Tracking Failed Email Subject 7. Poll Tracking Failed Email Template, 8. Poll Tracking Limit, 9. Poll Tracking Limit Exceeded Email Subject, 10. Poll Tracking Limit Exceeded Email Template - Options for Poll tracking and limit error emails.
Shipping Methods (Carriers) Configuration
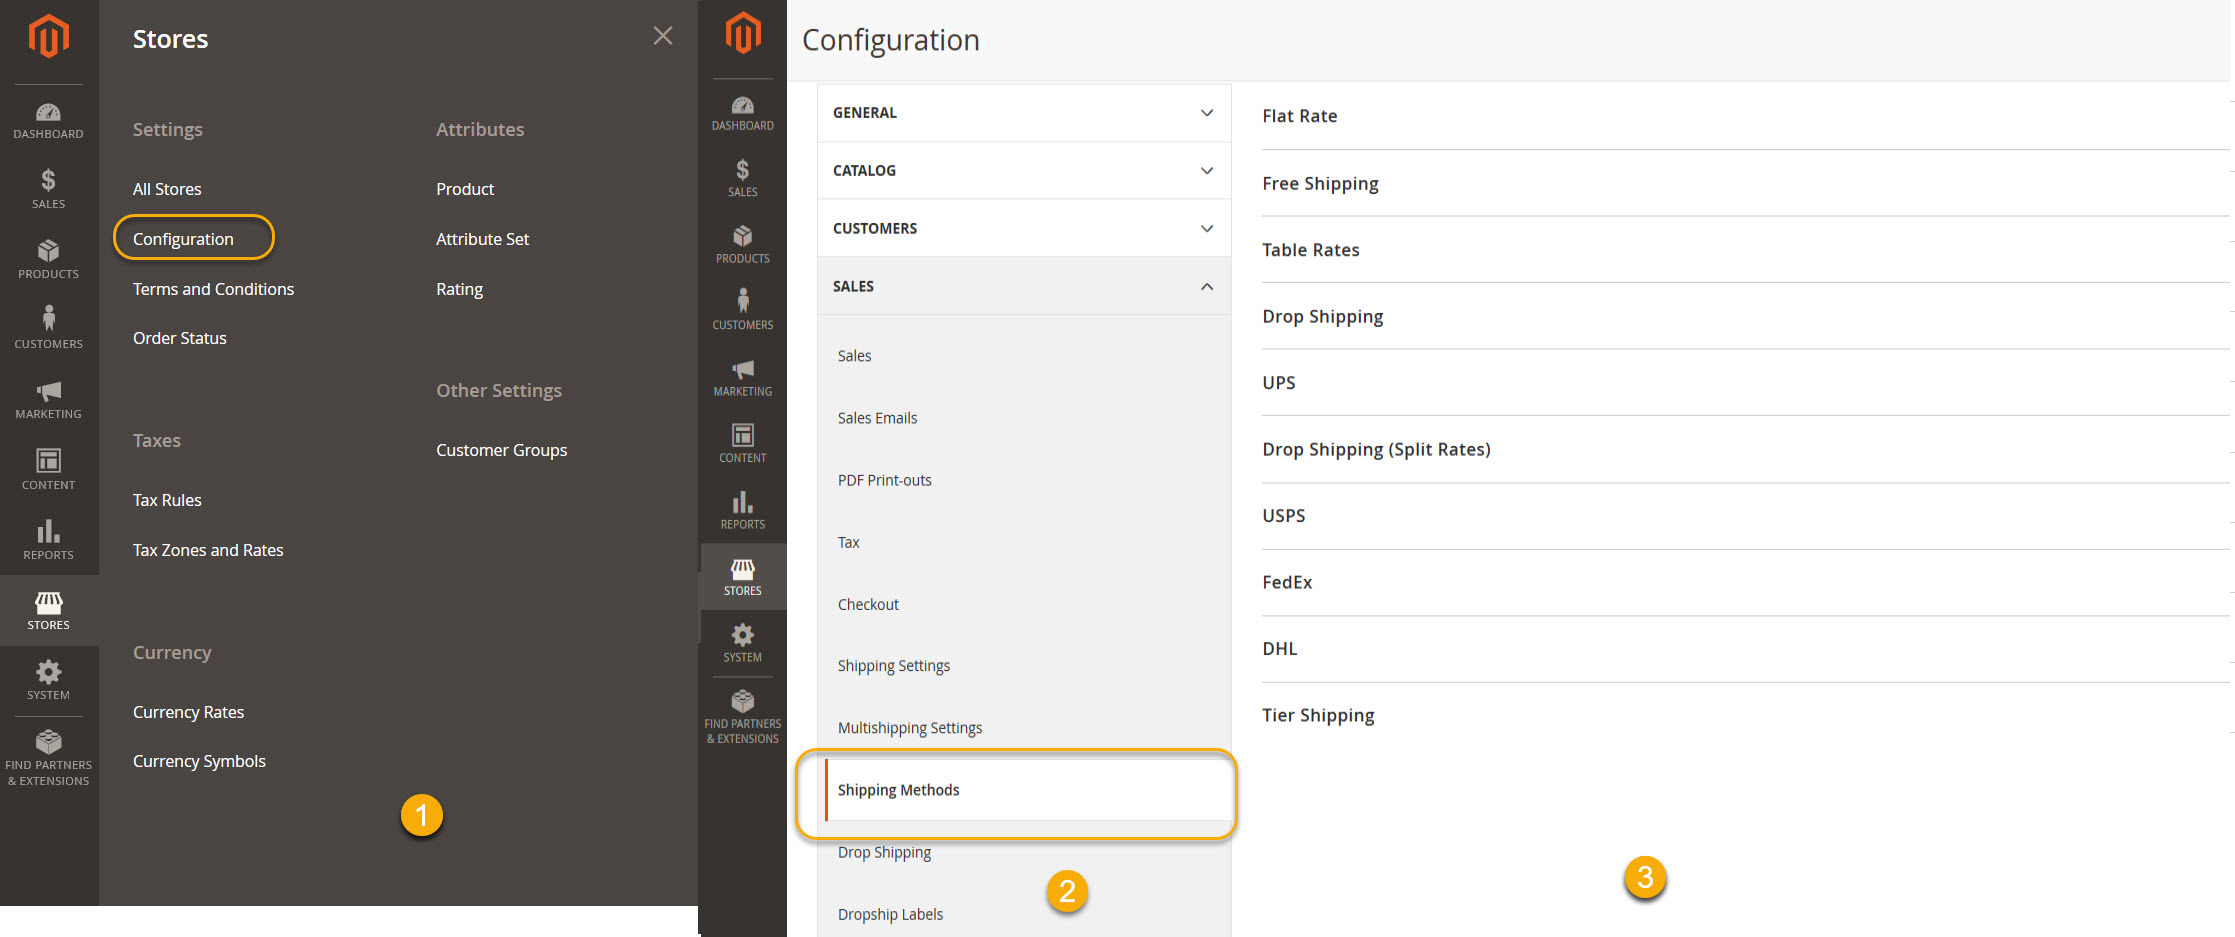
Go to System > Configuration > Shipping Methods
Disable all the shipping methods and enable Drop Shipping. It is very important that on production store only Drop Shipping method will be enabled, as if customers will choose other method, the checkout/order process will skip all uDropship logic and vendors will not be notified for these orders
Notice on Dropship Split Rates usage: When you have Split-Rate add-on installed make sure only one of two carriers enabled “Dropship” or “Dropship Split” otherwise they will conflict with each other

